
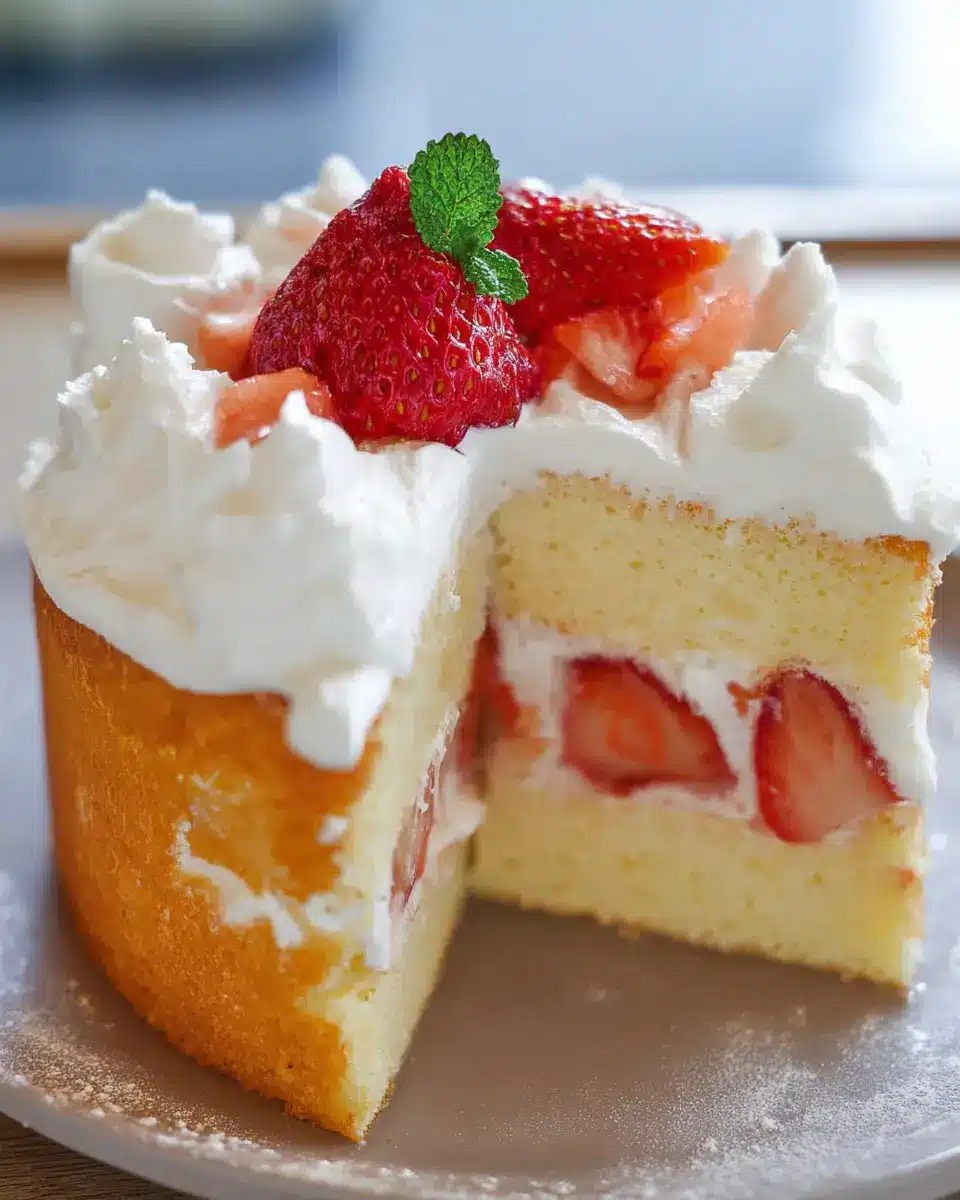
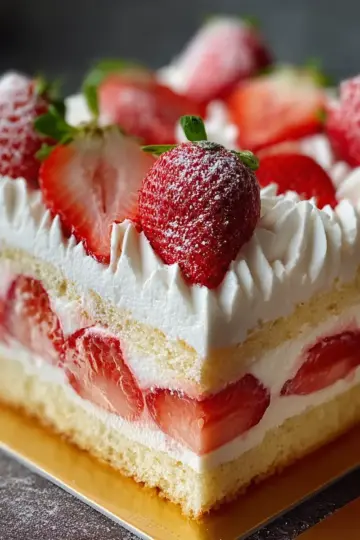
Introduction to Japanese Strawberry Sponge Cake
If you’re a young professional juggling a busy life, the Japanese Strawberry Sponge Cake is the perfect dessert to impress without overwhelming yourself. This fluffy, light cake, layered with fresh strawberries and whipped cream, offers a sweet escape during your hectic week. Not only is it visually stunning, but it also embodies the balance of flavors and textures that Japanese cuisine is renowned for.
Why spend hours in the kitchen when you can whip up this elegant treat using simple ingredients? The sponge cake’s airy texture complements the juicy strawberries perfectly, making it a delightful addition to any gathering—be it a casual brunch or a celebratory event. The beauty of this cake lies in its versatility: adjust the sweetness to your liking and even experiment with different fruits. If strawberries aren’t your thing, why not try blueberries or kiwifruits?
Plus, making this cake is a fulfilling project that allows you to unwind after a long day. To get started, check out resources like Just One Cookbook for additional tips on Japanese baking techniques and ingredients. With a little practice, your Japanese Strawberry Sponge Cake will become a go-to recipe that impresses friends and satisfies your sweet tooth. Enjoy creating something wonderful!
Ingredients for Japanese Strawberry Sponge Cake
Essential Ingredients for the Sponge Cake
Creating a delightful Japanese Strawberry Sponge Cake begins with the right ingredients. For a light and fluffy sponge, you'll need:
- 125g (⅘ cup) all-purpose flour, sifted three times to ensure airiness.
- 100g (⅖ cup) sugar, which not only sweetens but helps with texture.
- 4 large eggs, separated into yolks and whites; this step is crucial for volume.
- 60g (¼ cup) melted butter, adding moisture and richness.
- Butter and flour for greasing your cake pan, which helps in easy removal after baking.
Each component plays a vital role, so go for the best quality you can find. Fresh eggs are particularly important; they can make a significant difference in achieving that perfect rise.
Decoration and Syrup Components
Once your sponge is ready, it’s all about the decoration! You’ll want to gather:
- 18 mid-sized strawberries, freshly washed (those juicy berries are essential!).
- 400ml cream for whipping, giving that luscious texture.
- 10g (2½ tsp) sugar to sweeten the cream just right.
If you fancy a little extra flavor, consider making a syrup with:
- 40ml water and 10g sugar, boiled until dissolved. This optional syrup can keep your cake moist and heavenly.
With these ingredients, you're set to craft a beautiful and delicious cake that will impress everyone at the table! For more details, you can check out the Joy of Baking for tips on whipping cream and cake techniques.
Preparing Japanese Strawberry Sponge Cake
Creating the perfect Japanese Strawberry Sponge Cake is truly a delightful experience. Let’s walk through the essential steps to achieve a light and fluffy sponge, bursting with flavor and topped with luscious strawberries. This beloved dessert captures the essence of Japanese patisserie, and with a little patience and care, you'll master it in no time!
Preheat the oven
The first step in preparing your Japanese Strawberry Sponge Cake is crucial for achieving that perfect rise. Preheat your oven to 180°C (356°F). An evenly heated oven is essential for baking a sponge that’s airy and tender.
Prepare the cake tin
Next, you'll want to prepare your cake tin. Use an 18cm (7-inch) non-springform pan for best results. Generously coat the inside with butter to ensure easy release, then dust with flour. This step helps prevent sticking, making your cake removal a breeze!
Beat the egg yolks and sugar
In a mixing bowl, add the egg yolks (from four large eggs) and two-thirds of the sugar. Beat them together until the mixture is thick and pale, resembling a soft ribbon. This step is vital for creating the structure of your sponge, as the air incorporated will help it rise beautifully.
Whip the egg whites into meringue
In a separate bowl, it's time to whip the egg whites. Begin beating until soft bubbles form, then gradually add the remaining sugar in 2-3 batches. Continue whisking until you achieve stiff peaks, indicating that your meringue is ready. This light, fluffy texture will be key to the cake’s fluffiness!
Combine the mixtures
Gently fold the sifted flour into the egg yolk mixture. Then, to lighten up your batter, mix in a third of the meringue with a whisk. Once combined, carefully fold in the remaining meringue in batches, ensuring the mixture stays airy. Stir in melted butter at the end—don’t worry if it’s not totally blended!
Pour into the cake tin
Now it’s time to pour the batter into your prepared cake tin. Tap the tin gently on the counter to settle the batter evenly. This step will help to eliminate any air bubbles, allowing for a smooth rise during baking.
Bake to perfection
Place your cake in the preheated oven and bake for about 25 minutes. Keep a close eye on it; insert a bamboo skewer into the center to check for doneness. If it comes out clean, you’re good to go! If it's slightly moist, give it an extra 5 minutes.
Cool and prepare for decoration
Once baked, remove your cake from the oven and carefully drop the tin onto the work surface a couple of times. This technique helps detach the cake from the sides of the tin. Allow it to cool upside down on a rack, which keeps the texture light and fluffy.
As you enjoy the delightful process of preparing this Japanese Strawberry Sponge Cake, remember that practice makes perfect. Happy baking! For more detailed tips on achieving a rich flavor and perfect texture, check out resources like Food52 for expert advice.
Variations on Japanese Strawberry Sponge Cake
Mixed Berry Sponge Cake
Elevate your celebration with a Mixed Berry Sponge Cake! Simply swap out strawberries for a variety of berries like blueberries, raspberries, and blackberries. These berries not only add vibrant colors but also a delightful tartness that complements the sweetness of the cake. If you're interested in a lighter option, consider using Greek yogurt instead of whipped cream in your filling—it's creamy and tangy!
Tropical Fruit Sponge Cake
If you're dreaming of a vacation, a Tropical Fruit Sponge Cake is the perfect choice. Incorporate diced mango, pineapple, and kiwi for a refreshing twist. The bright fruits create a beautiful contrast against the sponge while offering a taste of the tropics. Drizzling a coconut syrup over the cake could give it an extra layer of flavor. For inspiration, check out other tropical desserts like the Mango Mousse for pairing ideas!
Feel free to get creative with these variations, and make this Japanese Strawberry Sponge Cake truly your own!
Baking Tips for Japanese Strawberry Sponge Cake
Achieving the Perfect Sponge Texture
To create a light and fluffy Japanese Strawberry Sponge Cake, focus on the technique of beating egg whites separately. This not only helps achieve a stable meringue but also incorporates air to give the cake its airy texture. Be gentle when folding in the flour and meringue to retain that precious volume. Remember, a properly preheated oven is essential for a lovely rise!
Importance of Fresh Ingredients
Using fresh ingredients is critical for the best flavor and texture. Opt for the freshest eggs you can find; older eggs can lead to a denser cake. For added flavor, select ripe strawberries. As noted in Serious Eats, they’ll not only taste better but will enhance the overall aesthetic of your cake. Fresh cream is equally important; it whips better and adds that rich, creamy mouthfeel. Happy baking!
Serving suggestions for Japanese Strawberry Sponge Cake
Best accompaniments
To truly elevate your Japanese Strawberry Sponge Cake, consider pairing it with a few delightful accompaniments:
- Fresh mint leaves for a refreshing herbal touch.
- A scoop of vanilla ice cream complements the cake’s sweetness perfectly while adding a creamy texture.
- A drizzle of matcha syrup brings a beautiful contrast in both color and flavor, merging earthy notes with fruity sweetness.
- Crushed pistachios or almonds for a crunchy texture that balances the softness of the sponge.
Presentation ideas
Presentation plays a vital role in making your Japanese Strawberry Sponge Cake irresistible:
- Layered displays: Serve individual slices on dessert plates garnished with a strawberry and a sprig of mint.
- Cake stands add an elegant touch and make your dessert the focal point of any gathering.
- Whipped cream clouds: Pipe additional cream around the base for a whimsical look.
- Edible flowers: Scatter a few vibrant blossoms around the cake for a pop of color and a touch of sophistication.
With these serving suggestions, your Japanese Strawberry Sponge Cake will not only taste amazing but also look spectacular, making it perfect for any occasion!
Time details for Japanese Strawberry Sponge Cake
Preparation time
The preparation of your delectable Japanese Strawberry Sponge Cake will take about 30 minutes. This is the perfect opportunity to get your kitchen organized and ready to whip up this delightful treat.
Baking time
Once you've mixed your batter, simply pop it in the oven at 180°C/356°F for 25–30 minutes. Keep an eye on it—out comes a light, fluffy sponge when that skewer comes out clean!
Total time
In about 1 hour, you’ll have a beautifully baked Japanese Strawberry Sponge Cake. After cooling, decorating takes around 15 minutes, making this a fantastic dessert you can prepare relatively quickly. Enjoy the fruits of your labor!
Nutritional Information for Japanese Strawberry Sponge Cake
When you're indulging in a slice of Japanese Strawberry Sponge Cake, knowing its nutritional profile can help you enjoy it even more! Here’s a quick breakdown:
Calories
Each serving of this delightful cake contains approximately 346 calories. It’s a sweet treat that fits nicely into a balanced diet when enjoyed in moderation.
Protein
You won't be sitting down to a protein feast, but this cake offers 6.2g of protein per serving, thanks mainly to the eggs used in the sponge.
Sugar Content
The cake includes about 18g of sugar per serving. This gives it a satisfying sweetness, perfectly complementing the fresh strawberries!
For more health tips and tricks, visit Healthline or check out MyFitnessPal for tracking your nutritional intake while you whip up this delicious cake!
FAQs about Japanese Strawberry Sponge Cake
What makes a sponge cake fluffy?
A fluffy sponge cake relies on a well-executed method of incorporating air into the batter. This is achieved by beating egg whites into stiff peaks and folding them gently with the yolk mixture. The key is to not over-mix, as seen in our recipe, where meticulous folding helps to maintain that airy texture. The quality of eggs also plays a significant role; fresh, high-quality eggs contribute to the cake's lift and lightness.
Can I use other fruits for decoration?
Absolutely! While strawberries are a classic choice for this Japanese Strawberry Sponge Cake, feel free to get creative! Other fruits like sliced peaches, kiwis, or mixed berries can add a delightful twist. Choose fruits that are ripe for the best flavor. You can also consider using edible flowers for a beautiful touch.
How long does the cake last?
Your Japanese Strawberry Sponge Cake is best enjoyed within two days for optimal flavor and freshness. While the sponge can last longer, the strawberries and cream start to lose their appeal after a day. To maintain its deliciousness, store it in the fridge and cover it to avoid drying out. For more tips on preserving cakes, check out Baking 101 basics here.
Conclusion on Japanese Strawberry Sponge Cake
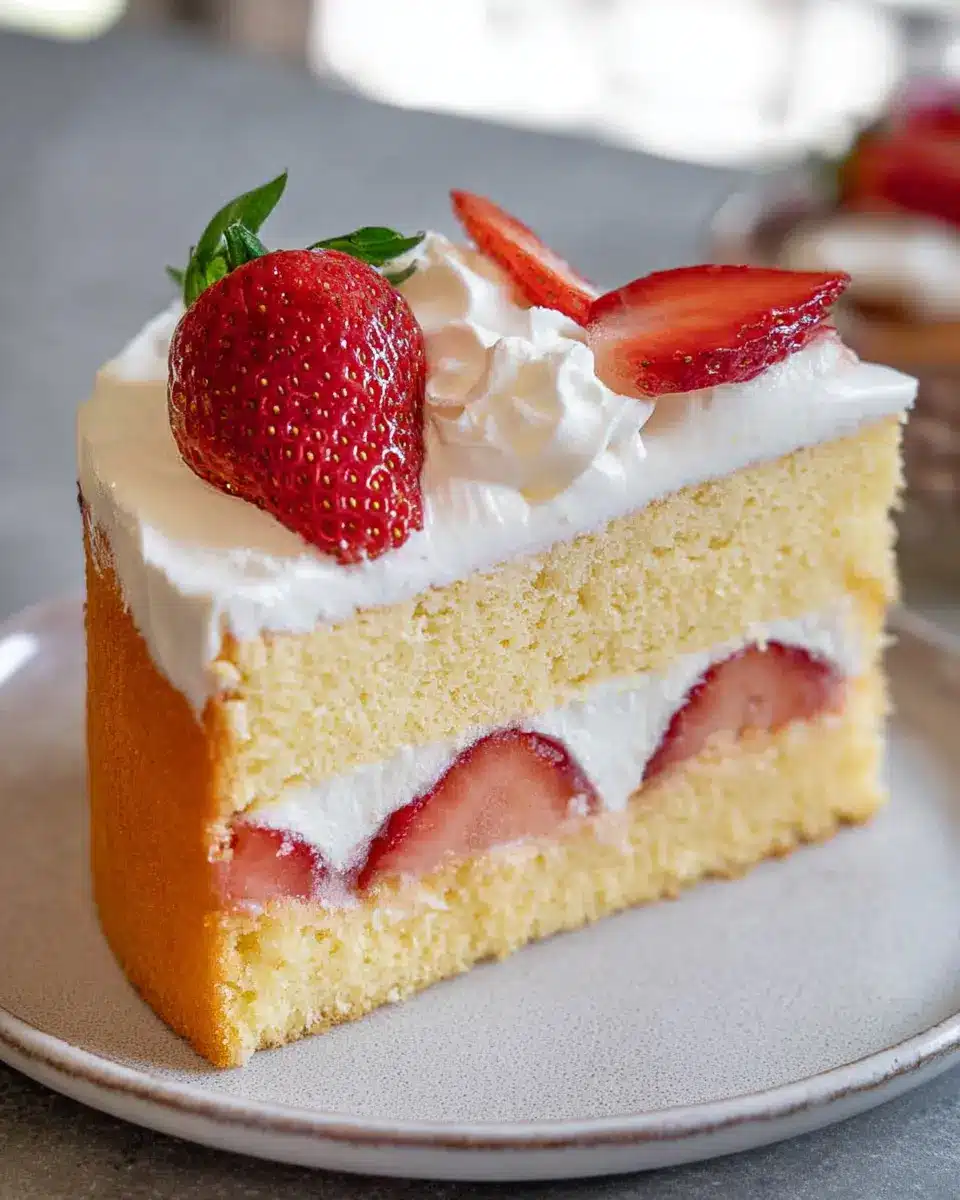
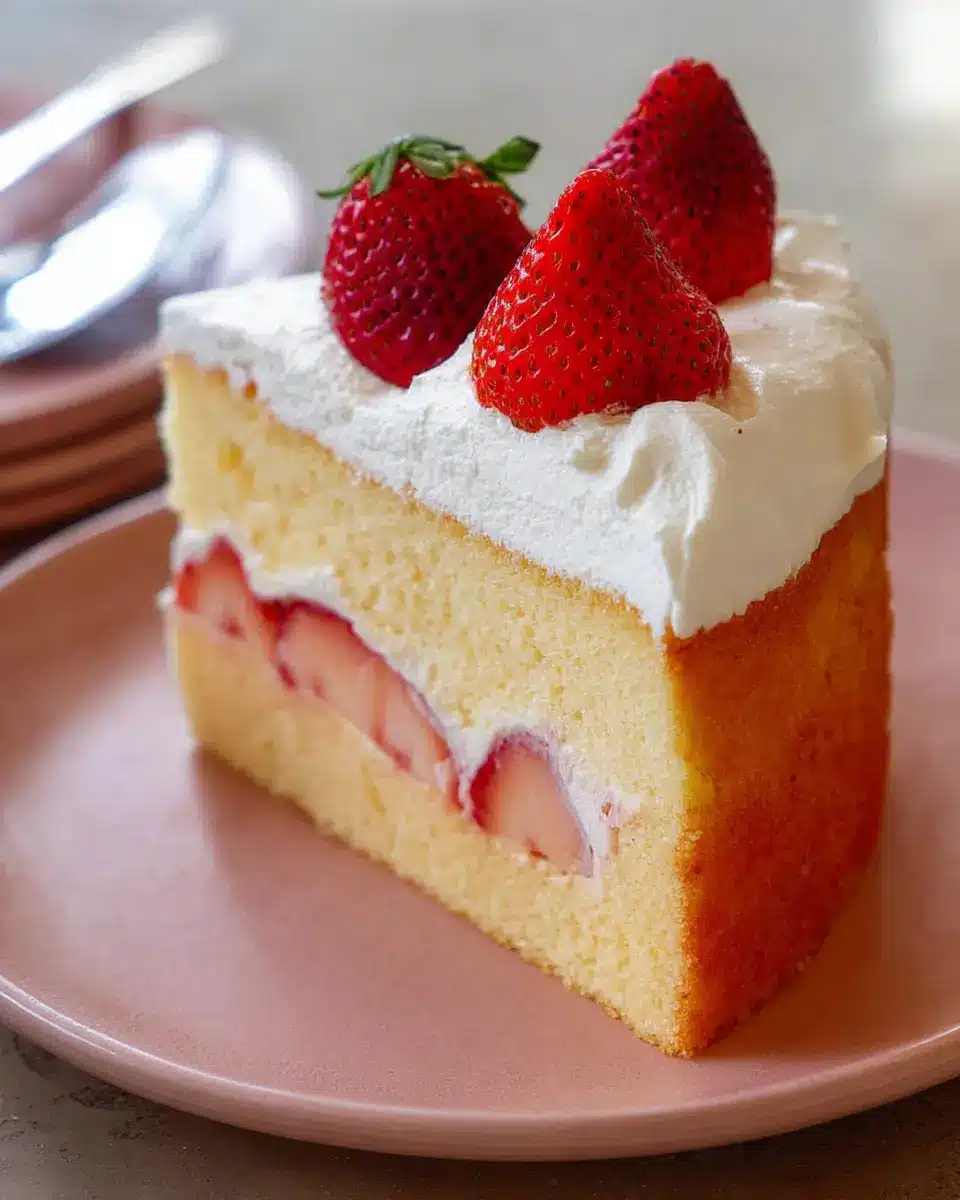
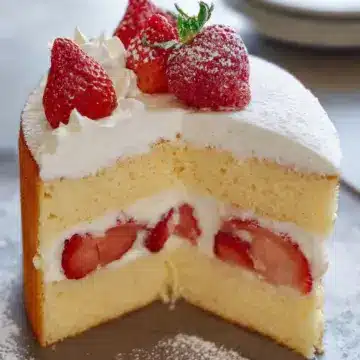
In summary, the Japanese Strawberry Sponge Cake is a delightful treat that combines light, fluffy sponge layers with creamy whipped topping and fresh strawberries. This cake is perfect for celebrations or just a cozy dessert at home. Enjoy the process and share it with loved ones!
Japanese Strawberry Sponge Cake
Equipment
- cake tin
- whisk
- mixing bowls
- spatula
- piping bag
Ingredients
Sponge Cake
- 125 g all-purpose flour, sifted 3 times
- 100 g sugar (note 1)
- 4 large eggs, yolks and whites separated (note 2)
- 60 g butter, melted
- Butter and flour to coat inside the cake pan
Decoration
- 18 mid-size strawberries (note 3)
- 400 ml cream for whipping (note 4)
- 10 g sugar
Syrup (optional)
- 40 ml water
- 10 g sugar
Instructions
Baking A Sponge Cake
- Pre-heat oven to 180°C/356°F.
- Coat the inside of an 18cm/7' cake tin with butter, dust with flour, then shake off the excess flour.
- Put the egg yolks in a bowl, add ⅔ of the sugar and beat the egg yolks until they become whitish and thick.
- In a separate bowl, beat the egg whites. Add the remaining sugar in 2-3 batches and beat further to make meringue.
- When the meringue becomes firm and can form a peak when the whisk is lifted, it is ready.
- Put the flour through the sifter and add to the beaten egg yolk. Fold the batter with a spatula.
- Transfer ⅓ of the meringue to the batter and mix with a whisk until smooth.
- Add the remaining meringue to the batter in 2-3 batches and fold.
- Pour the melted butter into the batter and fold several times.
- Pour the batter into the cake tin and drop the tin onto the work bench to settle the batter.
- Bake in the oven at 180°C/356°F for 25 minutes. Insert a skewer to check if cooked.
- Remove the cake from the oven, drop the tin onto the workbench to detach the cake, and let it cool completely upside down.
Decorating the cake
- If making syrup, bring the syrup ingredients to a boil, then let it cool.
- Whip the cream until soft peaks form, wipe and halve 10 strawberries.
- Slice the sponge cake horizontally in half and place the halves cut side up.
- Coat the cut surface of the two sponge cakes with the syrup gently.
- Spread whipped cream on the bottom half of the cake and fill with strawberries.
- Spread whipped cream on top and the round edge of the strawberries.
- Place the top half of the cake on it, syrup side down, gently press, and fill gaps with whipped cream.
- (Optional) Thinly coat the top and sides with whipped cream and chill for 10 minutes.
- Fully cover the cake with the remaining whipped cream and pipe additional cream around the edge with strawberries.
Leave a Reply